Parameters -
The waveform that the DSM outputs is defined by the following parameters:
- Start Frequency (Fstart)
- Stop Frequency (Fstop)
- Step Frequency (Fstep)
- Data Length
- Delay
- Ramping Method
- Frequency Hold Time
- Phase Reset
Before going into detail about the parameters, a brief explanation of how the board works will help you understand the parameters better. All frequency data is stored on a QDR-SRAM chip on the board. The RAM is capable of storing 458,640 frequency words each of size 24 bits. Each frequency in a chirp is represented as a 24-bit frequency word. Since there are 24 bits available, the DDS has a frequency resolution of just over 16 million (224).
The actual chip creating the waveforms is the Euvis DS852 direct digital synthesizer (DDS). In order to create a waveform, the DDS must have a clock input. The maximum frequency waveform that the DDS can output is half of the input clock due to sampling restrictions. So if you have a 2.0 GHz input clock the maximum output waveform frequency that you would be able to get is 1.0 GHz. The DSM creates chirping by storing a sequence of frequency words onto the RAM (maximum of 458,640) and then "feeds" these frequency words into the DDS chip sequentially at a maximum rate of 1/8th the input clock. Therefore, every 8 clocks the frequency word is sampled and a new frequency can be output. The DDS is phase continuous so the output waveform will be a smooth transition from one frequency to the next without any phase jumps.
Start, Stop, Step Frequency
Now that you know how the DSM operates, explaining the parameters should be easier. The Start Frequency is simply the frequency at which you want to start chirping or the lowest frequency in the chirp. The Stop Frequency is the maximum frequency which you want to chrip. The Step frequency is how much you want the frequency to go up by each time.
In the GUI, the Start, Stop, and Step frequencies can be entered as either an 8 digit hexadecimal frequency word or as a real decimal frequency. The frequency word to real frequency conversion is based on the clock that you have set in the Signature tab so be sure that this is correct. When entering a real decimal frequency, the application will automatically round the entry to the closest corresponding frequency word decimal translation. For example, if your input clock was set to 2000 MHz and you had entered 300,000,000 into one of the real frequency boxes, then the GUI will automatically round the frequency to 299,999,999.81 since no frequency word can exactly translate to 300 MHz and 299,999,999.81 is the closest.
It is important to note that only the Start Frequency and the Step Frequency is guaranteed. The DSM will always start a chirp at the Start Frequency and will always output the next frequency by adding the Step Frequency to the previous frequency. What is not guaranteed is the Stop Frequency. The DSM can only guarantee that the maximum frequency output by the DSM will not exceed the Stop Frequency but whether or not the maximum frequency in the real output waveform is equal to the Stop frequency depends on your Start and Step frequencies as well as the Data Length, which is basically just the number of steps in your chirp.
For example, if you set the Start Frequency to 100 MHz, your Step Frequency to 2 MHz and your Stop Frequency to 300 MHz then the maximum frequency output will be 300 MHz (Start Freq + Step Freq*100). But if you had instead chose your Stop Frequency as 301 MHz then the maximum frequency output will still be 300 MHz since the combination of your Start Frequency and your Step Frequency makes it impossible to output a frequency of 301 MHz.
The Stop frequency cannot exceed half of the input clock as mentioned before:
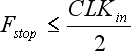
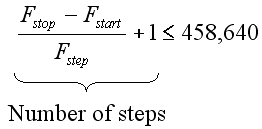
The total number of steps cannot exceed the limit of 458,640 memory addresses available:
Data Length
Data Length specifies the number of frequency points that will be output. For a more detailed discussion of Data Length, please see the Data Length page in this section.
Delay and Resets
Delay is how many memory addresses to keep at the starting frequency before chirping starts. For example if your Delay was “5” then the first 5 memory addresses will be at the Start frequency then at the 6th memory address, chirping will begin. Please note that the delay is counted toward the data length. So if you had data length set at 32 and you had 30 frequency steps but you also had delay set to 5, then the last 3 highest frequencies will not be output since the delay and the frequency steps together are more than the data length.
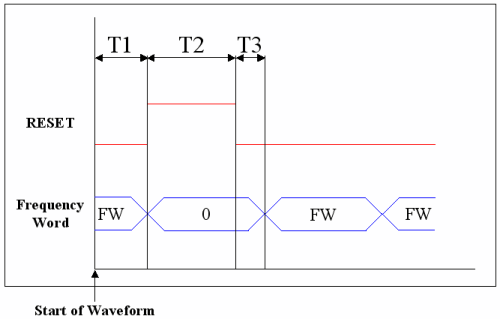
Normally, when the DSM is chirping a waveform in a loop, each iteration of the waveform is not guaranteed to start at the same phase. In order to assure that the DSM will start each waveform at 0 phase, you will need to turn on "phase reset by memory" which is an option in the Phase Reset portion of the Waveform window. In addition, you will also have to specify the three phase reset time parameters: RESET_T1, RESET_T2, and RESET_T3. The three time parameters are specified in data points.
RESET_T1 can be thought of as the phase reset delay. This is how many points you want to wait before the phase reset begins. You would set this to "0" if you want the phase reset to start at the beginning of a waveform.
RESET_T2 is the length of the reset. This is how many points the DSM should hold the phase at 0 before chirping starts again. We recommend that RESET_T2 be no shorter than 5 points.
RESET_T3 is the length of the chirp restart delay. When the DSM resumes chirping, usually it needs a bit of time to get up to the desired frequency that you want to start at. We recommend that RESET_T3 be at least 3 data points.
Below is a graphic description of the three reset time parameters:
Therefore the new Data Length equation becomes:

where DL is the Data Length and MD is the Memory Depth. This is the general equation to use for determining proper Data Length and Memory Depth.
Ramping Method
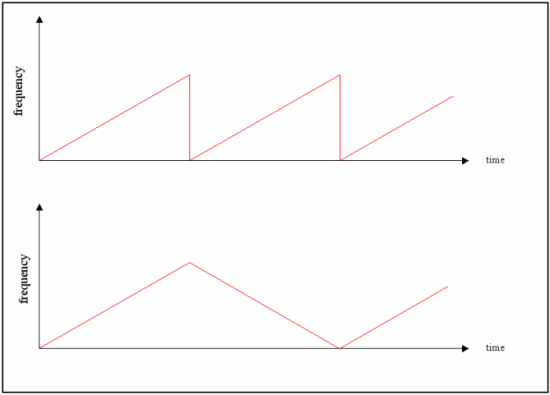
The ramping method which is specified in the program as Waveform Code determines the chirping characteristic. The output frequency can either ramp up and then when it reaches maximum frequency return to the starting frequency (like a saw tooth shape) or it can ramp up to maximum frequency and then ramp down to the starting frequency (like a triangle shape). In addition, there is also a reverse chirping available so that the frequency gets smaller and smaller.